Installation & Connections of MSST5/10-S step motor drive
1. Connecting the power supply
The MSST5-S accepts a DC supply voltage from 24 to 48VDC. The MSST10-S accepts a DC supply voltage from 24 to 80VDC. Using the connector supplied and AWG 16 or 18 wire, connect to the power supply as in the diagram below.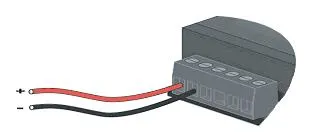 connecting the power supply Fusing Internal fuse: the MSST5-S and MSST10-S contain internal 10-amp fast-acting fuses External fuse (optional): if desired, we recommend:
  Be careful not to reverse the wires. Reversing the connections may destroy the drive and void the warranty. Regeneration When a step motor decelerates, it converts the kinetic energy of the load into electricity, much like a generator. It is estimated that some of this power is consumed by the motor and some by the drive. When large loads are run at high speeds, considerable energy is transferred to the power supply. The capacitors in simple linear power supplies are generally large and capable of absorbing this energy without causing damage. Switching power supplies usually shut down due to an overvoltage condition. The excess energy is then transferred back to the drive, resulting in damage. To prevent this, the use of an RC-50 regen clamp is recommended as illustrated below.
 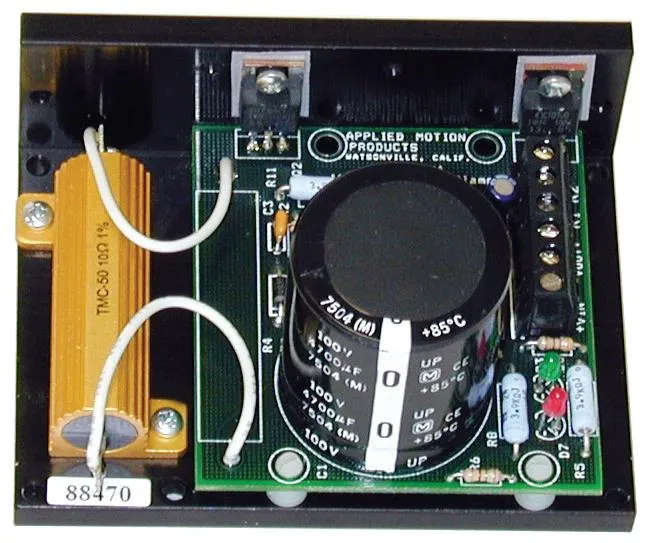 RC-50 regen clamp
 2. Connecting the Motor
Never connect the motor to or disconnect it from the drive. Insulate unused motor leads separately, and then secure them. Never connect motor leads to the ground or a power supply. There are several options for connecting a motor to a drive. Four lead motors can only be connected one way, as in the drawing below: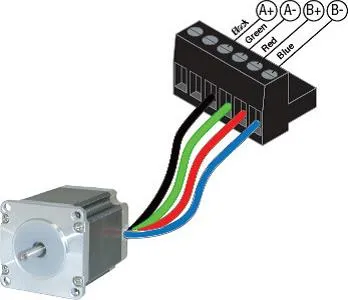 Six lead motors can be connected in series or center taps. When connected in series, motors produce more torque at low speeds, but cannot run as fast as when connected in a center tap configuration. To prevent overheating, the motor should be operated at 30% less than the rated current when operated in series. Wiring diagrams for both connection methods are shown below.
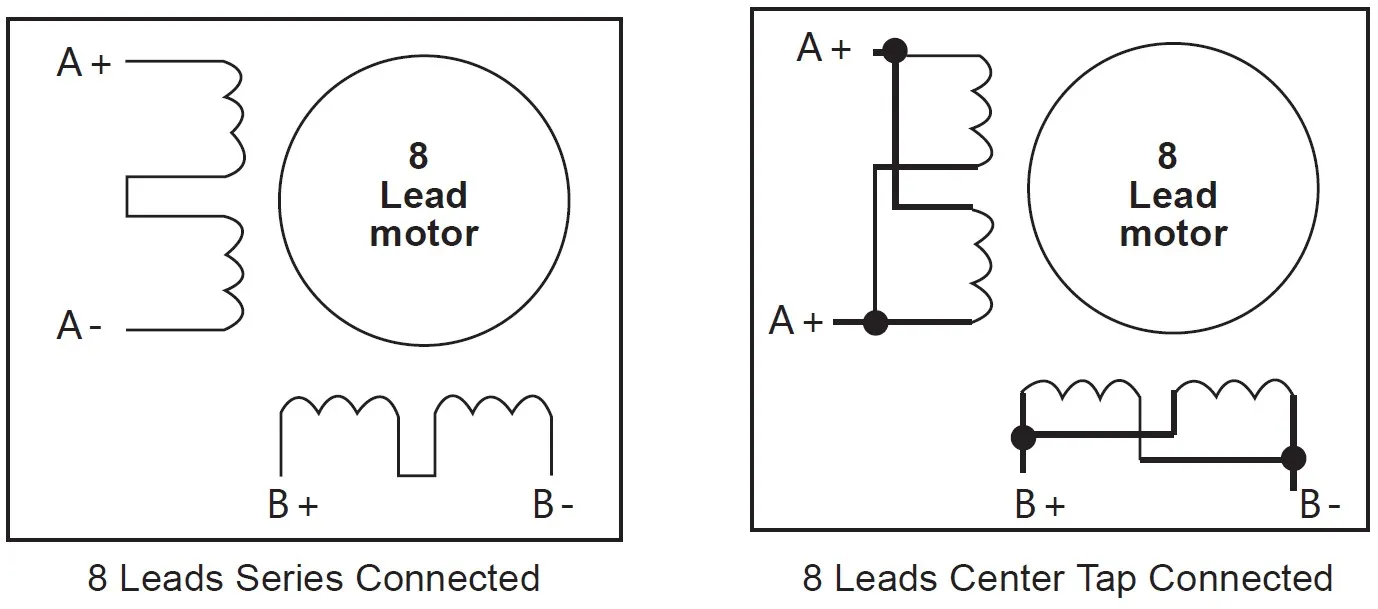
 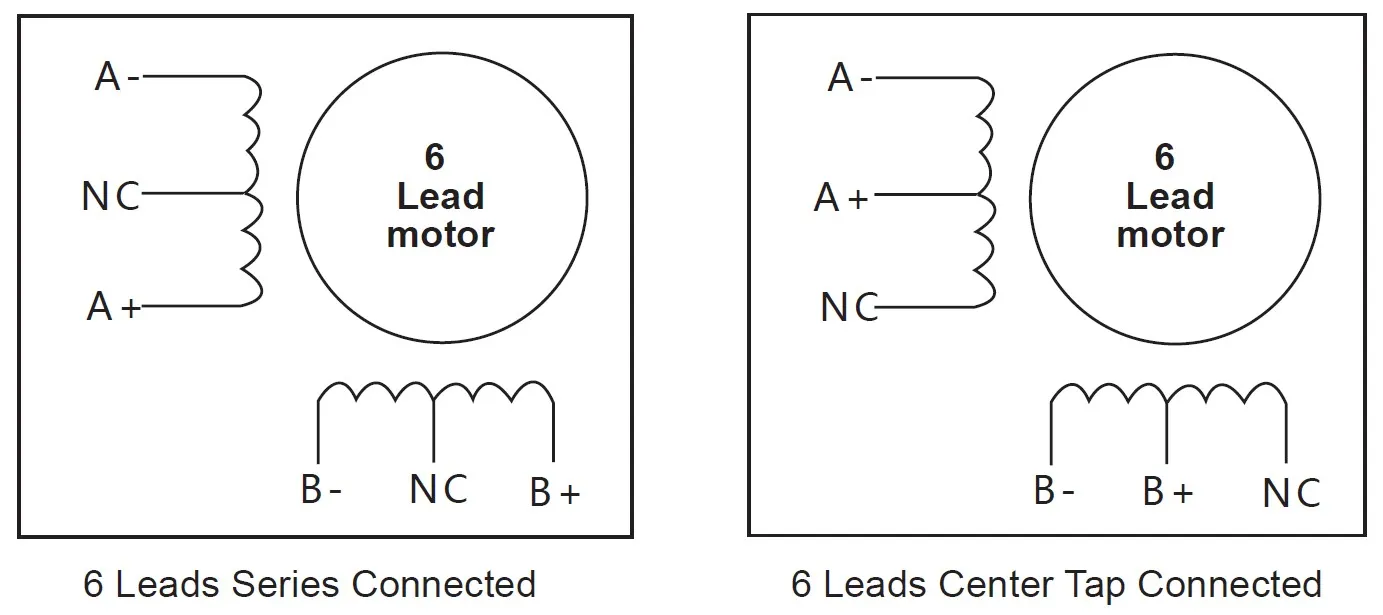 Note: NC = not connected Eight lead motors can also be connected in two ways: series and parallel. Similarly to six lead motors, the series mode produces more torque at low speeds and less torque at high speeds. When connected in series, the motor should be operated at 30% less than the rated current to prevent overheating. The wiring diagrams for eight lead motors are shown below.
3. Connecting to the PC using RS-232
Locate your computer within 6 feet of the stepping driver. A black adapter plug was included with your driver. There is a telephone-style jack on one end and a larger 9-pin connector on the other end. Plug the large end into the COM1 serial port of your PC. Secure the adapter with the screws on the sides. If your PC's COM1 port is already in use by another program, you may be able to use the COM2 port for the stepping driver. On some PCs, COM2 has a 25-pin connector that does not fit the black adapter plug. If this is the case, and you must use COM2, you may need to purchase a 25 to 9-pin serial adapter from your local computer store. There is also the option of using the USB port on your computer via a USB to RS232 adapter available on the market as an alternative to using the COM serial port.4. Connecting the inputs and outputs
Pluggable, screw terminal connectors are used to connect the inputs and outputs. The three inputs (STEP, DIR, EN) are on the six-position connector. There are analog inputs and digital outputs on the five-position connector, along with 5VDC and a ground for analog connections.4.1 Connecting Digital Inputs
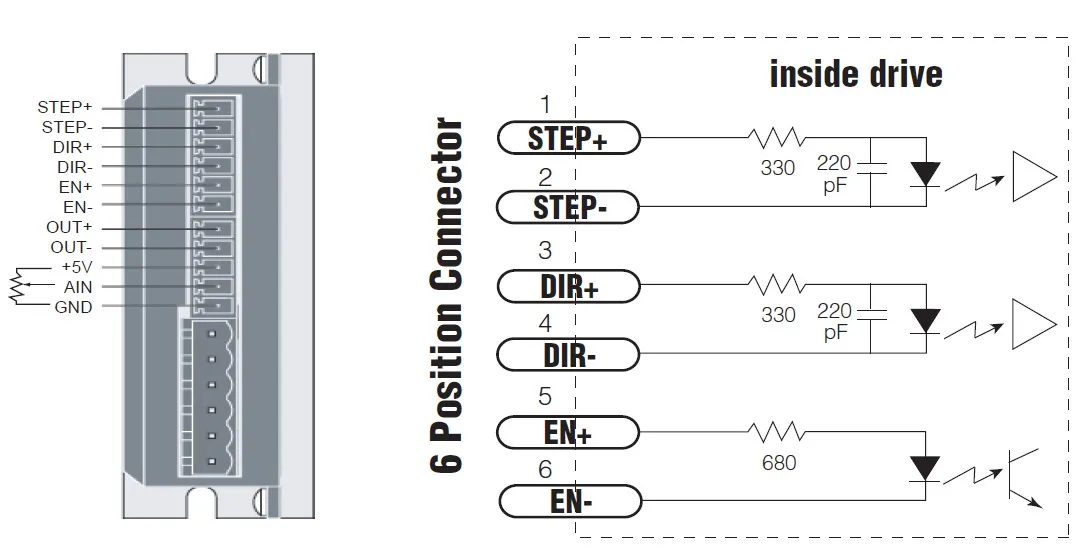
4.2 STEP&DIR Digital Inputs
The S drives are equipped with two high-speed inputs, called STEP and DIR. They accept 5-volt single-ended or differential signals, up to 2 M Hz. EN is a 5 to 12-volt standard digital input that can be used for motor enable, alarm reset, or oscillator speed change. All inputs are configured using the ST Configurator software. The STEP and DIR inputs can be used to connect an indexer, a master encoder, or a CNC hand wheel. They can also be used to connect sensors, switches, and other electronic devices. They can be used as the run/stop and direction inputs for velocity (oscillator) mode.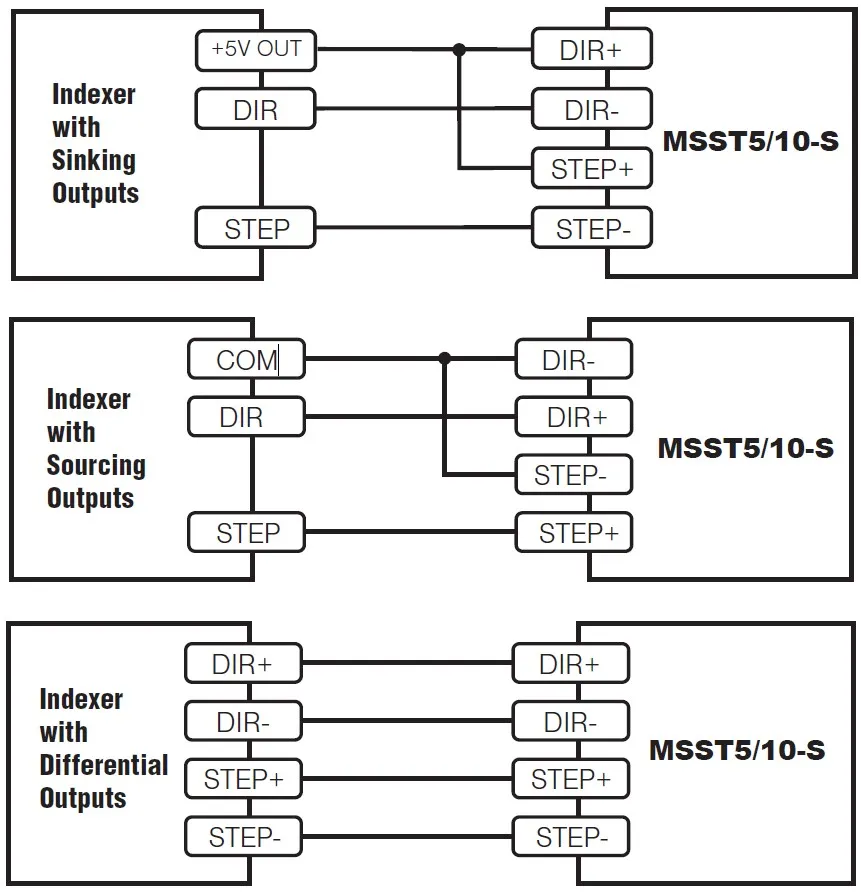
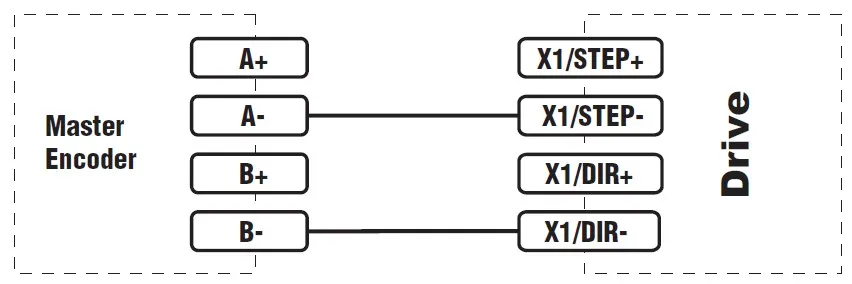
4.3 High Speed Input
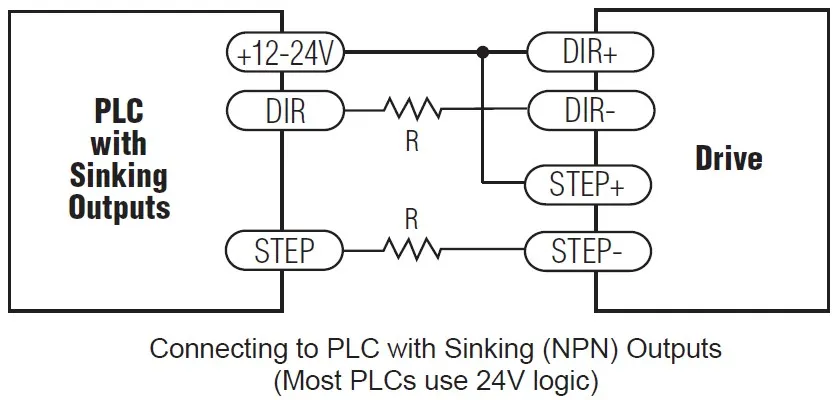
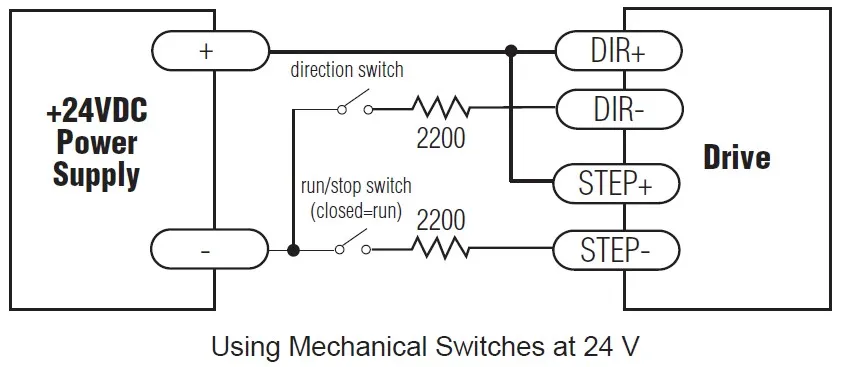
PLCs do not commonly use 5-volt logic. Signal levels as high as 24 volts may be connected to the STEP and DIR inputs if external dropping resistors are added as shown below: ▪ For 12-volt logic, add 820 ohm, 1/4 watt resistors ▪ For 24-volt logic, use 2200 ohm, 1/4 watt resistors WARNING: The maximum voltage that can be applied directly to a high speed input terminal is 5 volts. Never apply high voltage AC to an input terminal.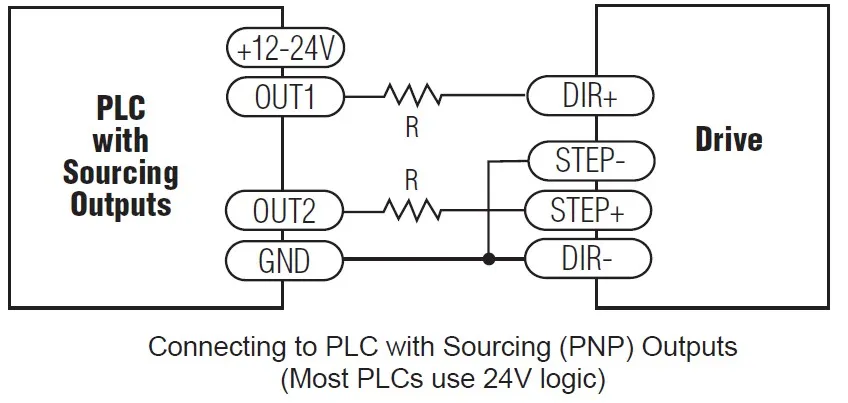
4.4 EN Digital Input
As mentioned above, the STEP and DIR inputs are configured for 5 volt logic. The EN input is designed for operation between 5 and 12 volts. Add 1500ohm to En for 24 volt operation.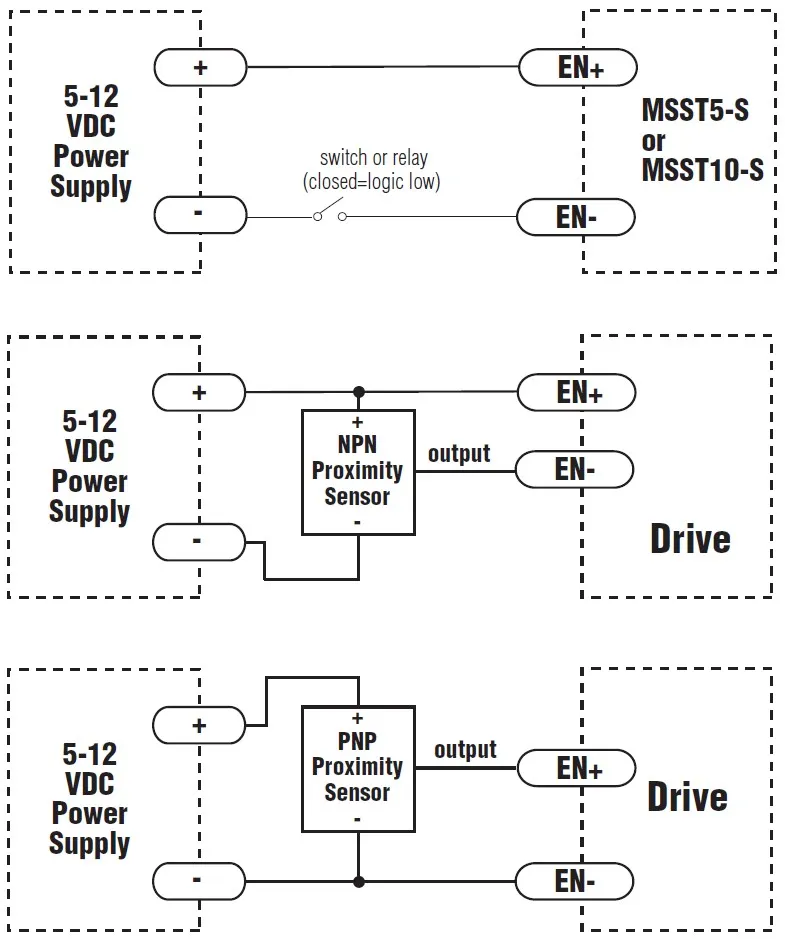
4.5 Analog Inputs
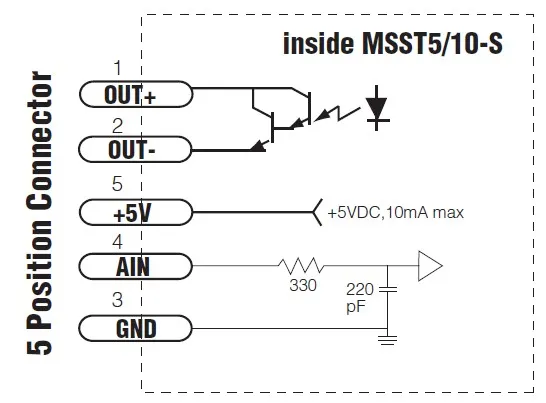 The MSST5-S and MSST10-S have one 0 to 5 volt analog input that can be used by the drive for controlling the motor speed in velocity mode. This input can also be used to read a voltage using the SCL "IA" commands.
 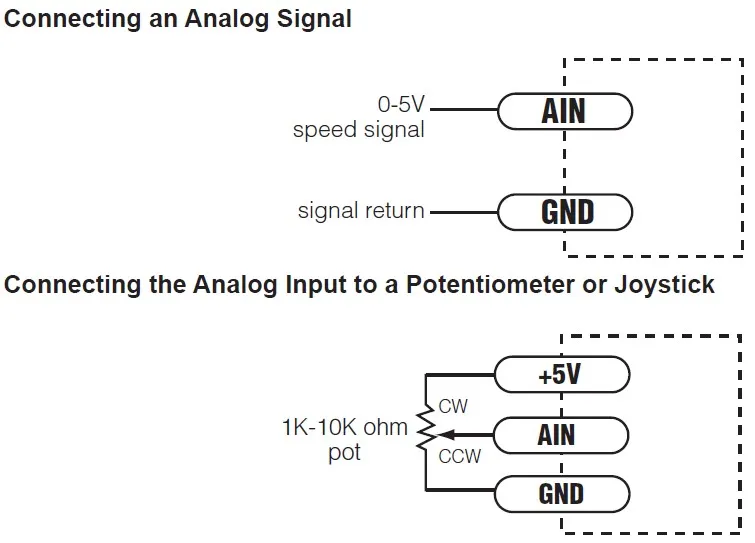 WARNING – The analog input must be used with care. It is not optically isolated and may operate improperly or could be damaged when system grounds are not compatible.
 4.6 Connecting the Digital Output
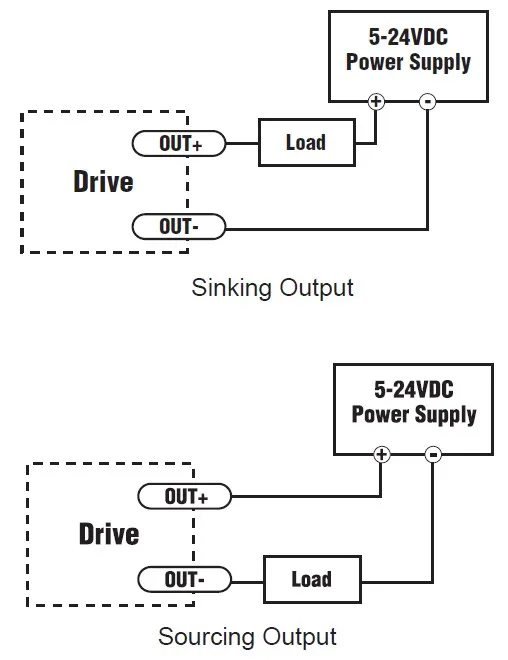
The MSST5-S and MSST10-S drives include one digital output that can be used in one of five ways: Brake: Control an electric brake relay, automatically releasing and engaging as the drive requires Motion: indicates when the motor is moving Fault: closes when a drive fault or alarm condition occurs, the red and green LEDs will flash an error code Tach: produces pulses proportional to the distance traveled (and thereby a frequency that is proportional to motor speed). General purpose: digital output controlled by the SCL SO, FO, IL and IH commands The output has separate + and – terminals and can be used to sink or source current. Diagrams of each type of connection follow. Do not connect the outputs to more than 24VDC. The current through each output terminal must not exceed 10 mA.