Stepper drives connecting to PC using Ethernet
Mating Connector RJ45, Addresses, Subnets, and Ports
Every device on an Ethernet network must have a unique IP address. In order for two devices to communicate with each other, they must both be connected to the network and they must have IP addresses that are on the same subnet.
A subnet is a logical division of a larger network. Members of one subnet are generally not able to communicate with members of another unless they are connected through special network equipment (e.g. router). Subnets are defined by the choices of IP addresses and subnet masks.
If you want to know the IP address and subnet mask of your PC, select Start…All Programs…Accessories…Command Prompt. Then type "ipconfig" and press Enter. You should see something like.

If your PC's subnet mask is set to 255.255.255.0, a common setting known as a Class C subnet mask, then your machine can only talk to another network device whose IP address matches yours in the first three octets. (The numbers between the dots in an IP address are called octets.)
For example, if your PC is on a Class C subnet and has an IP address of 192.168.0.20, it can talk to a device at 192.168.0.40, but not one at 192.168.1.40. If you change your subnet mask to 255.255.0.0 (Class B) you can talk to any device whose first two octets match yours. Be sure to ask your system administrator before doing this. You network may be segmented for a reason.
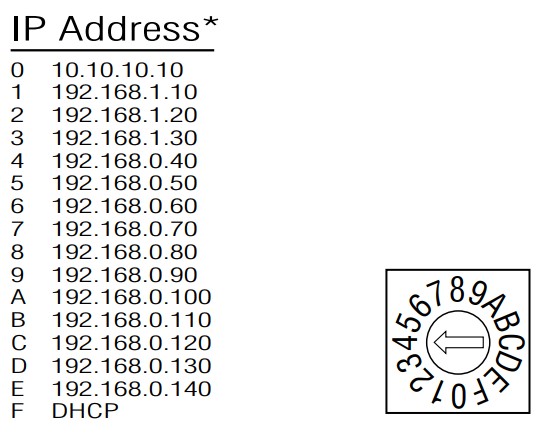
Your drives includes a 16 position rotary switch for setting its IP address. The factory default address for each switch setting is shown in the table to the right.
Settings 1 through E can be changed using the ST Configurator software (use ST Configurator for MSSSTAC5 drives). Setting 0 is always "10.10.10.10", the universal recovery address. If someone were to change the other settings and not write it down or tell anyone then you will not be able to communicate with your drive. The only way to "recover" it is to use the universal recovery address.
Setting F is "DHCP", which commands the drive to get an IP address from a DHCP server on the network. The IP address automatically assigned by the DHCP server may be "dynamic" or "static" depending on how the administrator has configured DHCP. The DHCP setting is reserved for advanced users.
Your PC, or any other device that you use to communicate with the drive, will also have a unique address.
On the drive, switch settings 1 through E use the standard class B subnet mask (i.e. "255.255.0.0"). The mask for the universal recovery address is the standard class A (i.e. "255.0.0.0"). One of the great features of Ethernet is the ability for many applications to share the network at the same time. Ports are used to direct traffic to the right application once it gets to the right IP address. The UDP eSCL port in our drives is 7775. To send and receive commands using TCP, use port number 7776. You'll need to know this when you begin to write your own application. You will also need to choose an open (unused) port number for your application. Our drive doesn't care what that is; when the first command is sent to the drive, the drive will make note of the IP address and port number from which it originated and direct any responses there. The drive will also refuse any traffic from other IP addresses that is headed for the eSCL port. The first application to talk to a drive "owns" the drive. This lock is only reset when the drive powers down.
If you need help choosing a port number for your application, you can find a list of commonly used port numbers at www.iana.org/assignments/port-numbers.
One final note: Ethernet communication can use one or both of two "transport protocols": UDP and TCP. eSCL commands can be sent and received using either protocol. UDP is simpler and more efficient than TCP, but TCP is more reliable on large or very busy networks where UDP packets might occasionally be dropped.
Option 1: Connect a Drive to Your Local Area Network
If you have a spare port on a switch or router and if you are able to set your drive to an IP address that is compatible with your network, and not used by anything else, this is a simple way to get connected. This technique also allows you to connect multiple drives to your PC. If you are on a corporate network, please check with your system administrator before connecting anything new to the network. He or she should be able assign you a suitable address and help you get going.
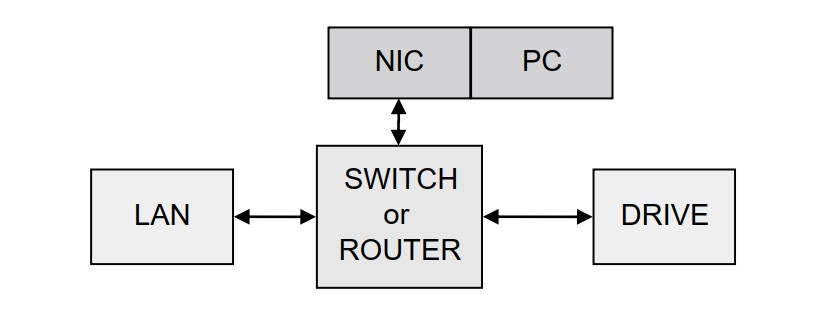
If you are not sure which addresses are already used on your network, you can find out using "Angry IP scanner", which can be downloaded free from www.angryip.org/w/Download. But be careful: an address might appear to be unused because a computer or other device is currently turned off. And many networks use dynamic addressing where a DHCP server assigns addresses "on demand". The address you choose for your drive might get assigned to something else by the DHCP server at another time.
Once you've chosen an appropriate IP address for your drive, set the rotary switch according the address table above. If none of the default addresses are acceptable for your network, you can enter a new table of IP addresses using Configurator. If your network uses addresses starting with 192.168.0, the most common subnet, you will want to choose an address from switch settings 4 through E.
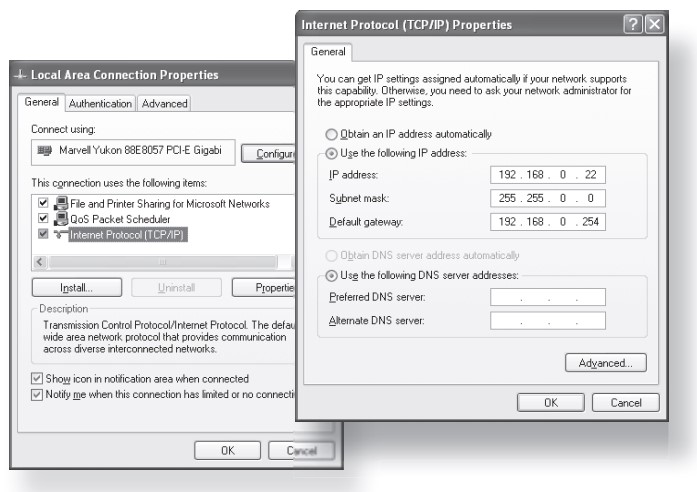
Another common subnet is 192.168.1. If your network uses addresses in this range, the compatible default selections are 1, 2 and 3. If your PC address is not in one of the above private subnets, you will have to change your subnet mask to 255.255.0.0 in order to talk to your drive. To change your subnet mask:
1. On Windows XP, right click on "My Network Places" and select properties. On Windows 7, click Computer. Scroll down the left pane until you see "Network". Right click and select properties. Select "Change adapter settings".
2. You should see an icon for your network interface card (NIC). Right click and select properties.
3. Scroll down until you see "Internet Properties (TCP/IP)". Select this item and click the Properties button. On Windows 7 and Vista, look for "(TCP/IPv4)".
4. If the option "Obtain an IP address automatically" is selected, your PC is getting an IP address and a subnet mask from the DHCP server. Please cancel this dialog and proceed to the next section "Using DHCP".
5. If the option "Use the following IP address" is selected, life is good. Change the subnet mask to "255.255.0.0" and click OK.
Using DCHP
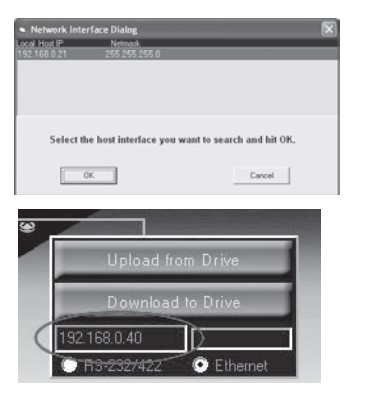
If you want to use your drive on a network that where all or most of the devices use dynamic IP addresses supplied by a DHCP server, set the rotary switch to "F". When the drive is connected to the network and powered on, it will obtain an IP address and a subnet mask from the server that is compatible with your PC. The only catch is that you won't know what address the server assigns to your drive. Ethernet Configurator can find your drive using the Drive Discovery feature, as long as your network isn't too large. With the drive connected to the network and powered on, select Drive Discovery from the Drive menu.
You will see a dialog such as this: Normally, Drive Discovery will only detect one network interface card (NIC), and will select it automatically. If you are using a laptop and have both wireless and wired network connections, a second NIC may appear. Please select the NIC that you use to connect to the network to which you've connected your drive. Then click OK. Drive Discovery will notify you as soon as it has detected a drive. If you think this is the correct drive, click Yes. If you're not sure, click Not Sure and Drive Discovery will look for additional drives on you network. Once you've told Drive Discovery which drive is yours, it will automatically enter that drive's IP address in the IP address text box so that you are ready to communicate.
Option 2: Connect a Drive Directly to Your PC It doesn't get much simpler than this:
1. Connect one end of a CAT5 Ethernet cable into the LAN card (NIC) on your PC and the other into the drive. You don't need a special "crossover cable"; the drive will automatically detect the direct connection and make the necessary physical layer changes.
2. Set the IP address on the drive to "10.10.10.10" by setting the rotary switch at "0".
3. To set the IP address of your PC:
a. On Windows XP, right click on "My Network Places" and select properties.
b. On Windows 7, click Computer. Scroll down the left pane until you see "Network". Right click and select properties. Select "Change adapter settings"
4. You should see an icon for your network interface card(NIC). Right click and select properties.
a. Scroll down until you see "Internet Properties (TCP/IP)". Select this item and click the Properties button.
b. On Windows 7 and Vista, look for "(TCP/IPv4)"
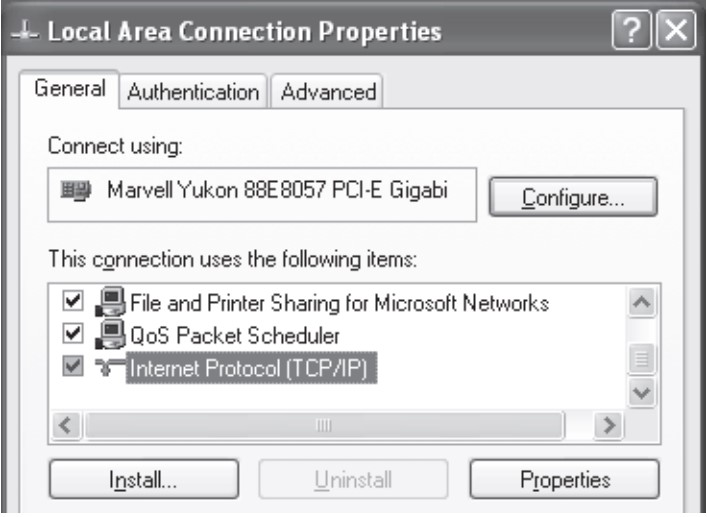
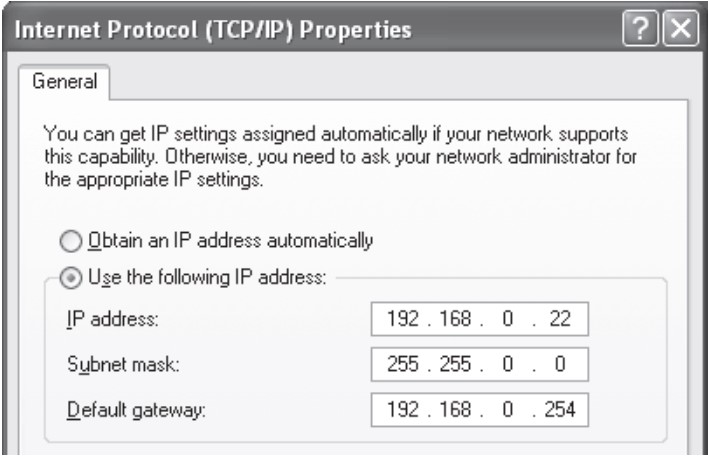
5. Select the option "Use the following IP address". Then enter the address "10.10.10.11". This will give your PC an IP address that is on the same subnet as the drive. Windows will know to direct any traffic intended for the drive's IP address to this interface card.
6. Next, enter the subnet mask as "255.255.255.0".
7. Be sure to leave "Default gateway" blank. This will prevent your PC from looking for a router on this subnet.
8. Because you are connected directly to the drive, anytime the drive is not powered on your PC will annoy you with a small message bubble in the corner of your screen saying "The network cable is unplugged".
Option 3: Use Two Network Interface Cards (NICs)
This technique allows you to keep your PC connected to your LAN, but keeps the drive off the LAN, preventing possible IP conflicts or excessive traffic.
1. If you use a desktop PC and have a spare card slot, install a second NIC and connect it directly to the drive using a CAT5 cable. You don't need a special "crossover cable"; the drive will automatically detect the direct connection and make the necessary physical layer changes.
2. If you use a laptop and only connect to your LAN using wireless networking, you can use the built-in RJ45 Ethernet connection as your second NIC.
3. Set the IP address on the drive to "10.10.10.10" by setting the rotary switch at "0".
4. To set the IP address of the second NIC:
a. On Windows XP, right click on "My Network Places" and select properties.
b. On Windows 7, click Computer. Scroll down the left pane until you see "Network". Right click and select properties. Select "Change adapter settings"
5. You should see an icon for your newly instated NIC. Right click again and select properties.
a. Scroll down until you see "Internet Properties (TCP/IP)". Select this item and click the Properties button.
b. On Windows 7 and Vista, look for "(TCP/IPv4)".
6. Select the option "Use the following IP address". Then enter the address "10.10.10.11". This will give your PC an IP address that is on the same subnet as the drive. Windows will know to direct any traffic intended for the drive's IP address to this interface card.
7. Next, enter the subnet mask as "255.255.255.0". Be sure to leave "Default gateway" blank. This will prevent your PC from looking for a router on this subnet.
8. Because you are connected directly to the drive, anytime the drive is not powered on your PC will annoy you with a small message bubble in the corner of your screen saying "The network cable is unplugged."
